
My infatuation with boat anchors has begun to reassert itself this summer, with the sudden acquisition of a Drake-2B receiver. I like working with separates: a tube transmitter like the W1TS Simple Transmitter or the QRP Blowtorch, and a vintage receiver as a companion. The Drake 2B has an excellent reputation, it is readily available, and most importantly, it is relatively compact for a tube rig.
During the month of August I started looking at the classified ads for a 2B, and of course, found several excellent deals which I had just missed. Now I know lots of folks find great buys at local ham fests, but for some reason the timing is always off for me. I manage to get to maybe two ham fests a year, and never in midst of summer. eBay is my constant, 24/7, exorbitantly priced personal ham fest. Rather than being patient, my immediate gratification gene kicked in, and I turned to eBay.
I found a 2B auction for a nice looking unit, not too expensive, whose owner described as “working”. After many years of buying used equipment on eBay, I have figured out the meaning of “working” with respect to eBay:
working, adj.
1. Not totally moribund; will light up if plugged in.
2. We don’t know how to test it, but didn’t find anything wrong.
3. It was working perfectly when we put it away 18 years ago.
This auction was accompanied by many encouraging photos of the rig all lit up, and the assurance that it was in good condition. There certainly wasn’t any doubt that the panel lights worked.

Drake 2B, working.
When the rig arrived, it did look good, and lit up most emphatically. My initial assessment of the received audio though was only so-so:
- there was a ferocious AC hum on the audio
- the audio levels were very low – full AF gain was barely driving an 8 ohm speaker
- the diode detector didn’t seem to work – I couldn’t find any AM signals.
I had pretty much expected that I would have to replace the electrolytic caps – this would most likely fix the hum. I ordered a re-cap kit from Hayseed Hamfest. These folks make up multiple caps in pin-compatible metal cans that will exactly replace the originals. The kit for the 2B consists of a replacement can containing four caps, and a single, stand-alone electrolytic. They also thoughtfully include a length of solder wicking braid for use unsoldering the old components.
While I waited for my re-cap kit to come, I started hunting down replacement tubes for the 2B on eBay. In general I like to have spare tubes on hand for any of the boat anchors in active use, and I suspected that a few tubes might need changing in my ailing 2B. The 2B uses ten tubes, seven different varieties; happily all of these tubes are easy to find and not too expensive. With judicious bidding, over the course of several weeks, I was able to come up with at least two replacements for each tube in the rig, at an average price of about $2 a tube.

Perhaps an obsesssive quantity of spare tubes.
The end of summer, and beginning of the school year are hectic times in our family, so it wasn’t until the end of September that I found a weekend with sufficient time to tackle the rig. Coincidentally, W2AEW, Alan, had just produced a series of four excellent YouTube videos documenting his refurbishment of a Drake 2B. Alan’s instructional videos on electronics and ham radio topics are superb, I highly recommend them.
After printing off a copy of the 2B manual I found online, I put the rig the bench and opened it up. No obvious damage was apparent, a good sign. Using the resistance chart in the manual, I checked the resistances to ground from each pin of each tube. This is a useful exercise, because it takes you on a tour of the major functional blocks in the radio. For the most part, the resistances were in the ballpark, so I pushed on.

2B resistance checks.
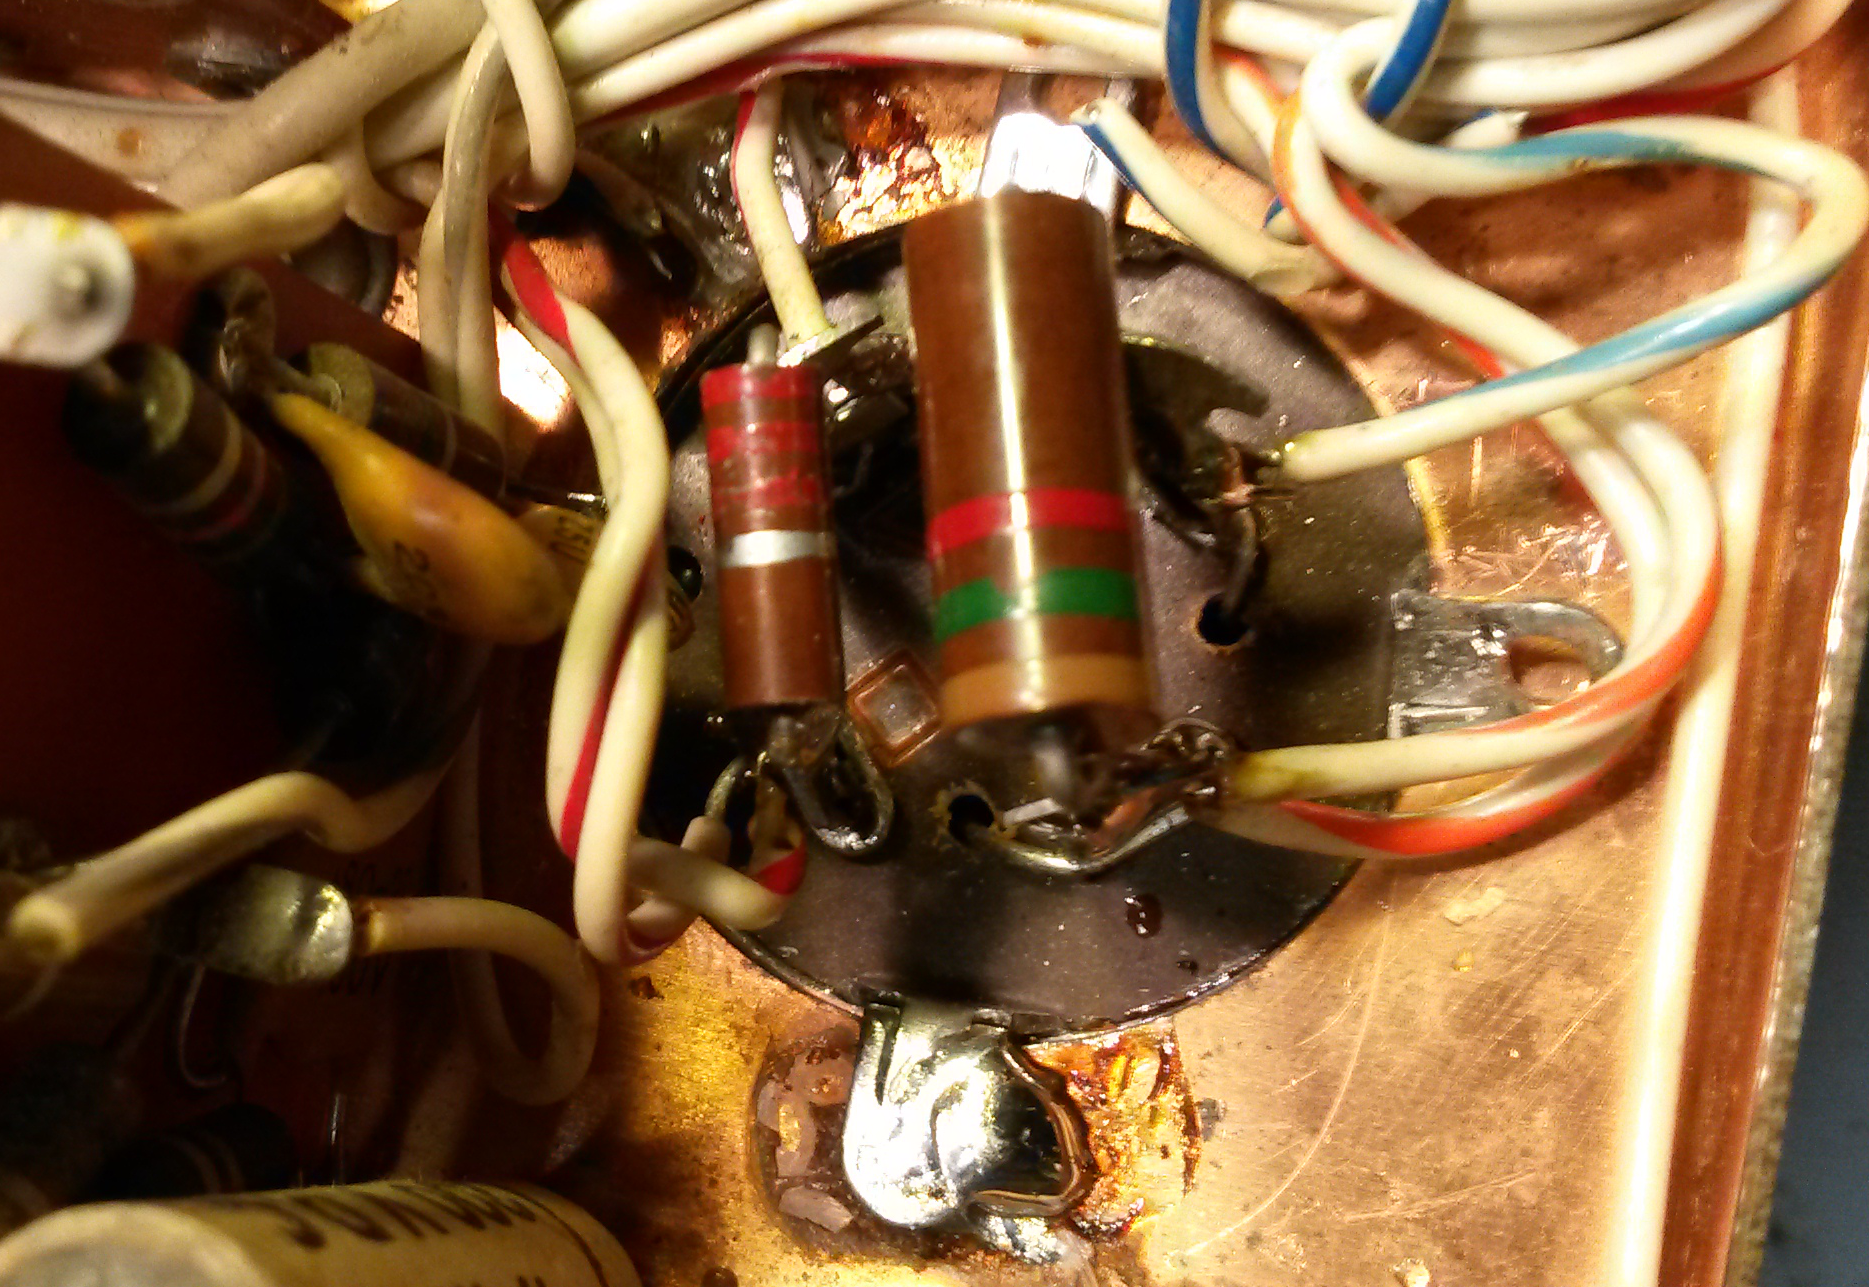
Examining the underside of the chassis in the area of the canned caps revealed a surprise. It seemed like there were some components in the rig that did not belong there! Oh no, a mod! Just to be sure, I reviewed Alan’s video where he showed the same area of his radio – stopping the motion to freeze the frame on the screen. No doubt about it – there was an alien invasion in my rig.

Alien invasion!
Identifying the connecting parts, I was able to localize where these caps had been added on the schematic to try to guess their function. First, I searched the web to locate common mods for the 2B, to see if any of these matched what I had found. No luck. There are a few widely reported 2B mods, these were not they. The best I could guess their function was:
- the cap in series with one pin of can might have been an attempt tame the hum?

Extra 150uF cap attached to can.
- the other two caps were both at points between the detectors and the audio preamp, going to ground. More hum suppression? Maybe trying to shape the audio?

Two other 25 uF caps at points between detectors and audio stage.
If anyone has any thoughts about why these might have been added I’d love to hear from you.
Anyway, I took a deep breath, and ripped them out. Now everything looked as expected. Before making any changes, I took a number of detailed closeup photos of the area where the work was to be done. This is invaluable for getting all the wires and components that connect to the caps back where they belong.
Base of the can caps, before replacement

The other electrolytic to be replaced.
The re-capping itself went fairly smoothly. I use a Hakko 808 desoldering tool (I highly recommend this tool, especially if you do a lot of repair work, or just make a lot of mistakes) which worked splendidly to unsolder all the lugs. However, the two of the tabs that hold the cap-can to the chassis were soldered most enthusiastically, and the 808, which has a rather delicate tip, was struggling to melt the solder blobs.

The Behemoth
I used a 250 watt iron in one hand, and the 808 in the other to melt and vacuum up the solder. Even at that I had a bit of a struggle prying those tabs off the chassis. Eventually the can worked free. The new caps went in without a hitch, and I was left with a very nice piece of leftover solder wicking braid as a backup.
Once the recapping was done, it was time to pay attention to the tubes.
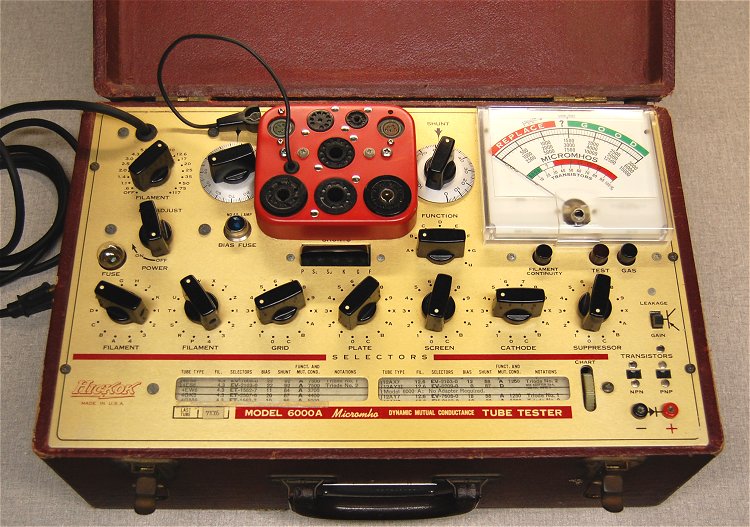
I have a very nice tube checker, a Hickok 6000A, which I got at the annual PCARA Bring & Buy Auction two years ago. It’s in good shape, and every once in a while I pull it out and check a tube, just for the heck of it. It’s also good for checking all those NIB/NOS* tubes from eBay. *[New in Box/New Old Stock]
I didn’t want to change out all of the tubes in the 2B blindly – instead I wanted to check each tube in turn, and only replace one if it seemed the replacement would improve matters. I tested each tube in turn, using the following rules:
- check for shorts. Shorted? out it goes.
- check for leakage. Excessive leakage – discard.
- emissions check. Here some judgement came into play: If the tube tested good on the test, keep it. If not, apply the same test to one or two of the replacement tubes, and only swap the tubes if the replacement fared better in the test.
The reasoning behind this last rule is simple: I have never tested the tube checker with known good tubes, or had it calibrated or refurbished. For that reason, a “low” emission reading for a particular tube is just a likely an indication of a problem with the tester as it is with the tube. The emission test values are kind of a qualitative measure, not like a short, which is a pretty deterministic game-ender.
Anyway, using this protocol I found four tubes I felt needed replacing.

The rogues gallery.
- the 6X4 showed several shorts. The replacement tube did not.
- the 6U8 had next to no emission reading. The replacement read “good”.
- two of the 6BE6 tubes had low emission readings, but the replacements read “good”.
There were a few of the other tubes that had low emission readings, but were consistent with readings from a sampling of replacements. I didn’t replace these. Most notable among this group was the 8BN8. This tube runs at a higher filament voltage, 7.5v, and I wonder if my tube checker is having problems maintaining the higher filament voltage.
With tubes updated, and re-capped, the rig sounds great. The audio is way up from before, in fact about 20% of the AF gain setting is a comfortable listening level with the same speaker. The diode detector now works – I can now find AM on 80 meters no problem. (Lots has been written about listening to AM on the 2B being somewhat sub-optimal, because the widest filter, 3.6 kHz, is rather narrow for AM. I don’t think I will be using the rig a lot for AM, but it’s nice to know it’s working.)
And the 40 meter CW subband is alive again! Lots of signals, and pretty good selectivity with the 500 Hz filter. It now sounds like a radio.

Photo of beautiful CW audio coming out of the refurbished 2B.
There is probably more work to be done on the 2B. I’m sure it could benefit from an alignment, and I’m looking into how best to accomplish that. The alignment procedures are simple, you just need an RF signal generator. I have a old analog tube model; I need to see if I can control its output levels well enough to use it for the task. That may be the subject of a future post.
I also have the matching speaker and Q-multiplier for the radio. The speaker works FB, the Q multiplier doesn’t do much of anything, but you can get it go into oscillation if you overdrive it. This piece of gear will probably be the subject of some future poking.
The weather is getting colder and wetter, making bench time look ever more attractive. There are lots of projects waiting in the wings, I’m looking forward to lots of chilly evenings spent snug in my workroom, tinkering.
73,
de N2HTT

Great stuff Mike. A local ham lent me his 2B for a few weeks when I was a kid and ever since then, it has been fixed in my mind as an elegant receiver. I too, like the fact that it is an all-tube receiver, yet doesn’t have the weight and size of a more traditional boat anchor. First I got to live my fondness for the 2B through Alan’s videos, and now I get to do the same through you. Thank you for this post!
Dave
AA7EE
Thanks Dave! It’s a lot of fun to do this kind of repair work – very different that building from scratch, it poses different kinds of problems to solve. 73, Mike