
This post is all about Linux. Not a smidge of ham radio included.
During my Intense Reloading of Linux Period (IRLP), I sampled many different distros on several different machines, and one of them really caught my eye – CrunchBang. I was completely intrigued by the minimalist look of the desk top, and particularly the area that displays system parameters in real time, along with a handy keystroke cheat sheet.
Crunchbang Conky
Although I didn’t wind up using CrunchBang, I was curious about the embedded status pane, and found out that it is a utility called Conky, and it is available for several different distros including anything based on the Ubuntu kernel and also Debian. I definitely had to have it on my Linux machines.
There is a lot written about the difficulties of setting up Conky. It has its own ideosyncratic configuration language, which is not easy to get the hang of. Luckily, there are many how-to sources to help with the setup. Here are a few:
From LHSPodcast, show notes #119 Article: How to install and configure Conky on Linux
and here is an Ubuntu one SettingUpConky
My first go at it involved installing a utility that promised to automate the management of Conky templates, called Conky Manager. It came with a bunch of templates, mostly involving elaborate skins which are coded in a script language called Lua. I picked one of these that wasn’t too Geigeresque, but I wasn’t happy. I wanted that embedded text look that CrunchBang featured. Eventually I abandoned this approach.
I took a whack at coding my own configurations, without too much success. I could get the text look I wanted, but I could’t keep the data on the desktop – changing workspaces, refreshing the desktop caused it to disappear, with the only way to get it back being a restart of Conky. Finally I decided that the only way to get a working configuration was to find one that someone else had done, that was close to what I wanted, and tweak it. And that is what I did.
The source of my Conky config was from another blog, where the author offered it as an example. I am pretty sure it was this blog. Here is what the config looks like on my Mint 15 install:

and here is what my tweaked version of the config contains:
# Conky, a system monitor, based on torsmo
#
# Any original torsmo code is licensed under the BSD license
#
# All code written since the fork of torsmo is licensed under the GPL
#
# Please see COPYING for details
#
# Copyright (c) 2004, Hannu Saransaari and Lauri Hakkarainen
# Copyright (c) 2005-2010 Brenden Matthews, Philip Kovacs, et. al. (see AUTHORS)
# All rights reserved.
#
# This program is free software: you can redistribute it and/or modify
# it under the terms of the GNU General Public License as published by
# the Free Software Foundation, either version 3 of the License, or
# (at your option) any later version.
#
# This program is distributed in the hope that it will be useful,
# but WITHOUT ANY WARRANTY; without even the implied warranty of
# MERCHANTABILITY or FITNESS FOR A PARTICULAR PURPOSE. See the
# GNU General Public License for more details.
# You should have received a copy of the GNU General Public License
# along with this program. If not, see <http://www.gnu.org/licenses/>.
#
alignment bottom_right
background
use_xft yes
xftfont DejaVu Sans Mono:size=9
xftalpha 1
own_window yes
own_window_type normal
own_window_transparent yes
own_window_hints undecorated,below,sticky,skip_taskbar,skip_pager
own_window_hints below
update_interval 2.0
double_buffer yes
gap_x 15
gap_y 28
maximum_width 250
minimum_size 200 550
default_color white
#poll
total_run_times 0
use_spacer right
TEXT
#${scroll 32 $nodename – $sysname $kernel on $machine | }
$nodename
$sysname $kernel on $machine
${color lightgrey}$hr
${color lightblue} Local:$color ${time %x %X}
${color lightblue} UTC:$color $utime
${color lightblue}Uptime:$color $uptime
${color lightblue}Frequency (in GHz):$color $freq_g
${color lightgrey}$hr
${color lightblue}RAM Usage:
$color $mem/$memmax – $memperc% ${membar 4}
${color lightblue}Swap Usage:
$color $swap/$swapmax – $swapperc% ${swapbar 4}
${color lightgrey}$hr
${color lightblue}CPU0 Usage:$color ${cpu cpu0}% ${cpubar cpu0 4}
${color lightblue}CPU1 Usage:$color ${cpu cpu1}% ${cpubar cpu1 4}
${color lightblue}Processes:$color $processes ${color lightblue}Running:$color $running_processes
${color lightgrey}$hr
${color lightblue}File systems:
/ $color${fs_used /}/${fs_size /} ${fs_bar 6 /}
${color lightgrey}$hr
${color lightblue}Networking:
${color lightblue}IP address: $color${addr eth0}${color lightblue}
eth0 Up:$color${upspeed eth0}${color lightblue}/ Down:$color${downspeed eth0}
${color lightgrey}$hr
${color lightblue}SSID: $color${wireless_essid wlan0}
${color lightblue}Signal: $color${wireless_bitrate wlan0} – ${wireless_link_qual wlan0}%
${color lightblue}IP address: $color${addr wlan0}${color lightblue}
wlan0 Up:$color${upspeed wlan0}${color lightblue}/ Down:$color${downspeed wlan0}
${color lightgrey}$hr
${color lightblue}Name PID CPU% MEM%
${color lightgreen} ${top name 1} ${top pid 1} ${top cpu 1} ${top mem 1}
${color lightgreen} ${top name 2} ${top pid 2} ${top cpu 2} ${top mem 2}
${color lightgreen} ${top name 3} ${top pid 3} ${top cpu 3} ${top mem 3}
${color lightgreen} ${top name 4} ${top pid 4} ${top cpu 4} ${top mem 4}
This config works reliably, and with a small additional bit of tweaking I was also able to use it on my ham radio machine, with HamOs, a Debian based distro installed.
All well and good, but I also wanted Conky to start promptly when I started my machine. This process varied slightly by machine, although the overal approach was the same: create a start script, and invoke that script from some agent that is active during startup.
The Conky startup script came from one of the advice blogs: . Basically the suggestion is to delay the start of Conky until your desktop is stabilized, apparently Conky grabs a snapshot of what is under it when it starts, and uses this as a backdrop for the information it displays. If you grab that snapshot too early, say when the screen is still totally black, you don’t get that nice transparent, integrated look. Better to wait.
Here is what my Conky start script looks like. It is pretty much the same on all three of the machines I have installed Conky on:
#!/bin/bash
sleep 10
if pidof conky | grep [0-9] > /dev/null
then
exec killall conky
else
exec conky
fi
This script will kill any existing instances of Conky that are running, and then start it using the default configuration file found at ~/.conkyrc. Notice the 10 second wait at the start of the script.
Adding Conky to the programs that are automatically started with your session in Linux Mint was very easy. From the system menu select System Settings >> Startup Programs >> Add, and browse to your Conky start script.

Mint System Settings – Autostart

Mint Startup Dialog

Conky Auto Start Config
This results in the creation of a .desktop file in the ~/.config/autostart directory. You could alternatively clone an existing desktop file and with a text editor turn it into a Conky-starter.The desktop file created by Mint on my machine looks like this:
[Desktop Entry]
Type=Application
Exec=/home/n2htt/bin/start_conky.sh
Hidden=false
NoDisplay=false
X-GNOME-Autostart-enabled=true
Name[en_IN]=Conky
Name=Conky
Comment[en_IN]=
Comment=
On my HamOs machine I punted, since HamOs, a Debian distro, doesn’t seem to offer the same GUI applet for setting up autostarts: I created desktop file manually in ~/config/autostart:
[Desktop Entry]
Type=Application
Exec=/home/n2htt/bin/start_conky.sh
Seems to work.
I received a Raspberry Pi as a Christmas present. I am having great fun with this little computer and there will be other blog posts about some of the projects we have set up on the Pi.
I have the Pi running headless, connected directly to our router by cable, and I use it via a VNC connection. If there ever was a machine that I wanted to see stats on when I connect, this is it. Once again, my slightly tweaked Conky config, and start up script are producing this beautiful display on the Raspian (one of the popular distros made for the RasberryPi, based on Debian) desktop:

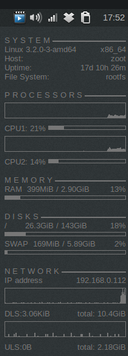
Raspbian Desktop with Conky

Raspberry Pi Conky Closeup
Interestingly, installing Conky on my Raspberry Pi revealed a minor issue that I have overlooked when I first set up Raspbian. By default, the Pi thinks it is in the UTC timezone, so local time and UTC are reported identically. I am in UTC -5, (ET). I don’t recall being offered the opportunity to change the time zone, but is it easily enough done by running this command: sudo dpkg-reconfigure tzdata:
Reconfigure Time Zone
For autostarting, I created an autostart directory under ~/.config, and added a desktop file similar to the one shown above. The user is pi instead of n2htt, otherwise it is identical.
[Desktop Entry]
Type=Application
Exec=/home/pi/bin/start_conky.sh
That should do it… except I haven’t rebooted the Pi to see if it works. It’s been running for 23 days straight since I first set it up, and I can’t bear to break the streak…
73,
de N2HTT
