
Well, another holiday season has steamrolled past, and as usual the need to celebrate rose to the top of the charts once again. My lovely XYL is always on the lookout for a ham radio themed holiday present for me, God bless her, and this year I was able to suggest something without the usual churning to find a suitable idea. Starting back in November, I became aware that the Four State QRP Group (4SQRP), renown for their excellent kit projects, was about to introduce a new QRP set paying homage to the paraset spy radios of World War II. I haven’t built a kit in a while, but as soon as I heard of this one, I was instantly lit up. What a cool idea: a little QRP transmitter, and regen receiver, made to fit in a wooden box harking back to the suitcase sets that went behind the lines in WW II. They had me at “wooden box”.
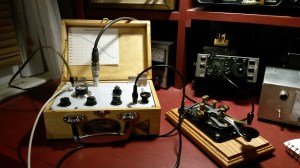
The Bayou Jumper, a Paraset replica in a wooden box.
Of course this modern paraset replica uses a very different implementation of the technologies incorporated in the 1940s version. Although both the historical parasets, and the 4SQRP unit (called the Bayou Jumper) make use of a regen receiver, the modern rig implements the receiver using FETs and varactors, where the historical rig was all tubes.
The transmitter in the set is basically the 4SQRP NS-40 transmitter sharing a single circuit board with the regen. The NS-40 was another 4SQRP club kit, a simple but very robust 40 meter transmitter, using a 2N7000 oscillator driving an IRF510 FET PA. It produces a healthy 5 watts, and features an unusual low pass filter implemented with spiral coils built into the circuit board, thus eliminating the need to wind two additional toroids.

Bayou Jumper board, spiral coils visible upper right.
There is a wealth of information about both the Bayou Jumper kit, and the historical sets available on the kit website. There is also a Yahoo discussion group, with a lot of building resources and hints, and links to some historical documentation of the parasets of yore. Take a look at the files section of the Yahoo group for some good sources of historical info about the parasets. At the time of this writing, the first run of 100 kits is sold out, but they are rekitting them for a second run immediately, so keep an eye on the website if you are interested.
While perusing the historical info, I learned that the original suitcase sets were designed to be “portable” and weighed 42 pounds. By the end of the war a few years later, that weight had dropped to 9 pounds! And of course the replica weighs much less than a single pound, including the wooden box.
So I first heard about the BayouJumper right at the end of the November, and immediately checked the website for availability. “Coming soon” was the intel at the time, but unlike other kit radios, this one had a built-in parallel project: the wooden box. The radio is designed to fit a specific hinged wooden box available from HobbyLobby. If you are lucky enough to live near a HobbyLobby retail store, you can purchase just the box that fits the radio, ordering online you have to buy the set of three, which leaves open the possibility of other wooden packaged projects. Of course, the woodworkers among us could home-brew something fancier (and have, check the photo section of the Bayou Jumper Yahoo Group), but for me the prospect of obtaining the box, and decorating it provided a pleasant diversion while waiting for the kit to become available.
The Yahoo Group provided a wealth of advice on how to finish the box, which I took literally. I sealed my box with several coats of Minwax Polycrylic finish, and then used their Polyshades stains over the clear coat. I went through a number of colors I didn’t like, and wound up with a light coat of “Mission Oak”, with a heavier coat of “Honey Pine” over it. All I can say is that the samples at the hardware store look nothing at all like the color I got. Mine turned out looking like a pine box with a layer of travel grime over it. I’m not complaining.

Wooden box with travel decals
Pictures of the project prototype showed it plastered with vintage travel stickers, miniaturized to fit the scale of the box. These turn out to be home-brew decals! A very interesting, and potentially useful technology. You purchase you sticker images in the form of downloadable PDF or JPG files (I got mine on etsy), and print them on special decal paper, which is available not surprisingly from decalpapers.com. After printing your images using high-quality photo settings for the printer, you spray the pages with several coats of gloss plastic finish like Krylon. After they are thoroughly dried, cut them out, soak briefly in cold water, and slide into place on the object to be decorated. Couldn’t be easier, and it actually worked. I finished with a light coat Polycrylic to lock them in place.
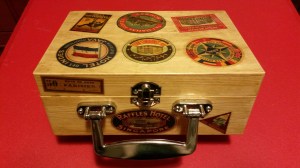
Decorated box (romance side.)
With the box all prepared, and with more time to wait until the kit shipped, I starting thinking about how to accessorize my as yet unbuilt paraset. Shipping along with the kit are these neat little boards that allow you to solder on a modern HC49/U crystal, and attach two pieces of #10 solid wire to make a board that will plug into a crystal socket intended for an FT-243 crystal.
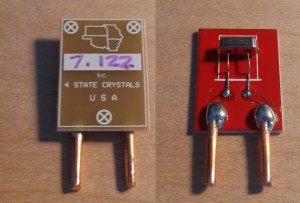
Both sides of HC49 to FT-243 crystal adapter board.
Photos of these little boards on the Yahoo group showed a variation with pads for a trimmer capacitor and an inductor in series, to make a pluggable, pullable crystal. With my recent fascination with VXOs and crystal pulling still running high (see last post), I got the idea to build a pluggable VXO for the SKCC frequency of 7.055, using a bunch of shorty HC49 crystals, an inductor and a polyvaricon cap. I used a piece of single sided PCB, and just isolated the pads with a Dremel tool by hand. The circuit is very simple: just the variable cap and the inductor in series with the crystal. I used five crystals in parallel – putting them in parallel makes them easier to “pull” and increases the frequency range you can get. Also those little shorty crystals don’t have a lot of quartz in them, paralleling them increases the current they can handle.
My finished VXO used a 10 uH choke I had lying around, a 200 pF polyvaricon, and gives a range of about 3.5 kHz. Just enough to dial in that guy calling CQ almost but not quite on your frequency. I’ve used it with the W1TS simple transmitter with very good results.
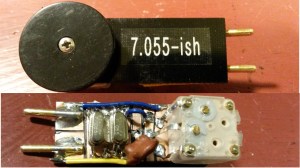
7055ish pluggable VXO
Finally it was just a matter of watching the website for the release of the kit, hoping it would be in time for a Christmas delivery. By dint of checking my phone every 30 seconds for 10 straight days, I was aware of the kit release pretty promptly on the first day, Dec 18. I ordered pronto, and by Thursday before Christmas, had my kit in hand to be wrapped and placed under the tree. The minor obsession with early ordering turned out to be worthwhile – the first kit run of 100 was sold out in five days. Fear not, 4SQRP is doing addition kitting runs, and the kits will be available again soon. Watch the site.
Santa came through, and since I wanted to use the radio from the alt-qth later in the holiday week, I needed to get started on the build right away. The kit is straightforward to build, and the documentation is very good. There were a few minor inconsistencies, but checking the Yahoo Group resources before building should alert the builder to any gotchas. I am a slow kit builder: I check the value of each part with a meter, and mark up both the parts list and the schematic as I progress. It took me 5 hours over two sessions to complete the build, but I imagine a faster worker would take much less time.
Everything worked at first power up… but some major tweaking was needed. The transmitter section was fine, working as advertised and putting out a solid 5+ watts into a dummy load. The regen was going into and out of oscillation with the regen control, but I could not find the oscillator signal at all using my KX3. After reading on the reflector that it could be quite a ways above 7.3 MHz, I tried again, and finally found it up at 7.752!
Jim N5IB, one of the designers of the kit has been offering guidance on the reflector, and indicated that moving the regen down into the ham band was accomplished by either using the trim cap, or squeezing the turns together on the toroid. I wasn’t having any luck with the trim cap, which is only a 20 pF adjustment, so I took a look at the toroid on a photo of a completed board on the Yahoo group. Big difference, so I squeezed the coils to make them look like the photo, and that did the trick.

Toroid before squeezing

Toroid after squeezing
I wound up with a tuning range of 7.030 – 7.175 which is kinda high, but covers all the areas I am interested in. While I was testing with everything opened up, it was going from 7.015 up, but it seems to have jumped up once everything was in the box. Jim provided a hint on moving the range down a bit – adding a few pF across the base of the trimmer cap, and I may revisit this as some point. But for now it is working fine and I decided not to mess with it further. I painted the coil with some home-brew coil dope (artisanal) since I wasn’t able to get my hands on any clear nail polish.

Artisanal Coil Dope
My regen goes in and out of oscillation at about 75% of the pot range, and I wasn’t able to budge it with the corresponding trimmer cap. Anyway, I can get it to go into and out of oscillation at both ends of the tuning range, that’s all it needs to do, so again I decided it was good enough.
While hunting for the tuning limits, I was turning the rig on and off by plugging and unplugging the power cord, and I broke one of the tabs on the power jack. It had been mentioned on the Yahoo group that they are fragile and not to bend them too much on installation. Luckily, it was the ground side that broke, and I was able to solder the wire directly to the ground side of the jack. That was the worst mishap I encountered with the build, everything else went smoothly.
Well one week after Christmas is famously Straight Key Night (oh yes, also Hogmanay) and what better time to try out my new Bayou Jumper on the air. I have collected a fair number of crystals over the years, and so have lots of frequency options available on 40 meters. Because of SKN, the CW portion of the band was happening, leading to a textbook example of:
N2HTT’s Axiom of Operating Rock-bound
For any given crystal frequency there will be either:
- A. Someone calling CQ exactly 500 Hz above or below you transmitter frequency with his passband cranked down tight, or:
- B. Someone exactly on your crystal frequency, in hour two of a four-hour rag chew.
The upper end of 40 meters was too busy to shoe-horn in, but luckily I have a few rocks up in the old Novice CW portion of 40 meters, above 7.100 MHz. The Bayou Jumper is shipped with a 7.122 crystal (apparently the QRP-ARCI frequency) so that’s a good spot to look for them. I finally chanced across Tommy, AA4TB, calling CQ spot on 7.1175, one of my rocks. He was also QRP, running an HW-9, and we had a short but pleasant contact although he was faint and there was lots of QRM on my side. He must have been mystified when I told him my rig was a Bayou Jumper, and I was so excited that I forgot to send my SKCC number, but all in all, an excellent first QSO. A while later I worked Bill, KB0BWY on the same frequency, for my second and final SKN contact this year. The QSO with Bill is the current standing distance record for my Bayou Jumper at 1400 km.
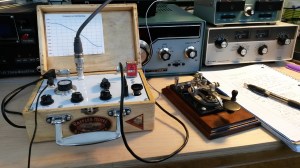
On the air for SKN!
Aside from breaking in the Bayou Jumper, SKN was kind of a bust for me this year as suddenly, on Friday afternoon (Dec 30th) I completely lost the ability to be heard on the air. I usually check for my signal on Reverse Beacon Network, but at some point Friday I just disappeared. I tried different rigs, actually put up a new antenna (40 meter sloper dipole), went QRO, switched coax, but all to no avail. I wasn’t getting out. It wasn’t until Sunday afternoon that I took the MFJ tuner out of the circuit, and just as suddenly I was back! Something must have fried in the tuner; I have it on the bench but haven’t had time to check it out yet. Unfortunately it was the last item I switched out, so I was down for most of the event.
After playing with the Bayou Jumper for a few days, I’m beginning to understand how the hams of yore could operate successfully using simple regen receivers. I’ve built a couple of regens, which work great, but I just couldn’t figure out the interplay between transmitter and receiver. Regens are so sensitive, they get blown away by the local signal when you transmit. Forget about hearing yourself in the receiver as a sidetone, or spotting you transmit frequency.
The Bayou Jumper revealed the secret to me: when you are transmitting, turn the receive audio OFF. Works like a charm, just mute the darn thing. No need to spot your transmitter, just get the receiver in the neighborhood of where you are calling, and sweep up and down a few kHz looking for a reply. It couldn’t be easier. I was definitely over thinking the whole process. I am going to try my old regens out with one of my home-brew transmitters, to see if I can get this to work.
Oh yes, one other thing: the Bayou Jumper has no sidetone. Actually not a big deal, your sending will be fine even without one. Where we’re going, we don’t need sidetones…
73 (and Happy New Year)
de N2HTT

Very good presentation. What a nice radio (and VXO)!
Thanks Robert, it was a really fun project start to finish.
73
Mike
I like the HC49 to FT243 adapter boards – what a good idea. Great post Mike, and you really convey the thrill and excitement of building a modern Paraset!
Dave
AA7EE
Thanks Dave! This little rig has me seriously thinking about adding external muting to my WBR regens – I think that would make them very serviceable with a transmitter and a switch. Another project… 🙂
73,
Mike
– and as we know Mike, there’s always another project 🙂 Everything we do gives us an idea for something else!
73,
Dave
Excellent job, excellent review! 73 Dave
and thank you Dave (and 4SQRP) for such a great kit! Not only is it a fine little rig, but the history, decorating the box… I don’t think I’ve ever had more fun with a kit. Go 4SQRP!
73,
Mike
Pingback: A cootie? | 73, de N2HTT
I found some stickers at Michael that have each of the 50 states on the sheet. I do recall travel stickers as well but i couldn’t find them. I plan to add a state sticker to the box after I work them.