I’m very excited about operating out-of-doors this season. It seems to be in the air: the May 2017 issue of QST is featuring portable operating, with a nice assortment of hiker-ish tools adorning the cover. It wasn’t that bad a winter as winters go, but apparently we are all aching to get outside and get a little fresh air. And play radio, of course.
So for the last few weeks I have been getting together my kit to try my hand at SOTA (Summits on the Air). Basically, take a hike, climb a hill, set up a state-of-the-art QRP station, work a pile-up, pack up and go home. And, post lot’s of photos…
In addition to the physical fitness aspects of this ham radio niche (I’m working on that – actually, that’s part of my sudden fascination with hiking), there’s the challenge of setting up a station in any and all conditions. And, the toys are just the best.
I recently purchased a trail-friendly QRP rig, the MTR-4B from LNR Precision. I have only just started to use it, but I am really liking this little rig. Really essential QRP radio, nothing extra but everything you could want. I’ll probably do a write-up on it in another post, but in this post I want to discuss a critical accessory that took me a while to figure out. The fiberglass, telescoping, antenna mast.
Naturally, operating en plein air requires an antenna, and those pesky things generally need to be elevated into the air, the higher the better. There are two basic models for portable antenna supports:
“Throw a wire into a tree”
and
“The lightweight telescoping fiberglass push-up mast”
You really need to be prepared to employ either when you arrive at your summit. Of course, you may find a perfect, conveniently placed tree to throw a wire up into. (I wrote a blog post about this a while back.) Then again, you may not. Or, you may not want to, because you are in park land where you are not permitted to attach anything to the trees. In that case, the second choice is the way to go.
There are readily available, inexpensive fishing poles (called “squid poles” or “crappie poles”) that can be used to support an antenna at a reasonable height. These are typically 16 – 25 feet long when extended, but they suffer from two drawbacks: first, being intended for fishing, they are extremely flexible especially at the tip, and the weight of a wire antenna can cause the end to bend over sharply, and even break under the right (wrong) conditions. The other disadvantage is that collapsed, these things are about 4 1/2 feet long, or longer. You could pretend it was a hiking staff, but it seems just a cumbersome thing to carry on a hike up a hill.
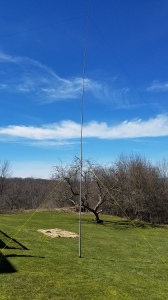
No, what you want is a purpose-made fiberglass mast designed with hiking in mind. The one I have is from SOTABeams, extends to about 33 feet, and collapses down to about 26 inches. It weighs about three pounds, not a trivial load while hiking, but definitely worth its weight in altitude. This mast will easily support an end-fed half wave dipole (my favorite wire antenna) at a point a couple of feet from the top without bending over. Perfect… except it needs to be guyed in place.
Here’s the rub: it’s a beautiful day, you’ve hiked to the top of your local summit ready to deploy your station, but you are alone. Everyone had something better to do than take a hike to place where they could hold your mast up while you set up the guy lines. So now you are trying to somehow balance the mast against a rock or your daypack while trying to get the guy lines snug, running around in a circle over and over. It can’t be done. I know.
So it became necessary to figure out how to put up a 30 foot mast with four guy lines alone, and I think I’ve figured it out. All you need to do is a little one-time prep work before you head out, and you’ll be able to set up your mast alone in just a couple of minutes without even breaking a sweat. The answer makes use of simple trigonometry. (If simple trigonometry is not available in your area, regular trigonometry will do.)
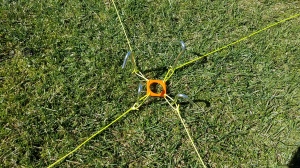
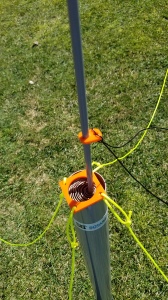
The guy line scenario usually consists of four (but you can get away with three) guy lines attached to the mast some ways up the pole, extending out at a 45 degree angle, and anchored in the ground. The method I’m about to describe will work for any guying system, but since I purchased a guying kit with my mast from SOTABeams, I’ll describe how it works with that. My kit consisted of a guying ring (actually a plastic square with a round hole that fits around mast, plus 4 attachment holes), and a generous length of fluorescent yellow lightweight cord. You divide the cord into 4 equal parts, and tie each part into one of the attachment holes using a bowline knot. This is the starting point for my single-handed guying technique.
But first, a word about knots. This technique relies on using specific knots, and I’ll tell you what they are, but I’m not going to explain how to tie them. Look them up on Youtube, you can find much better descriptions than I could give. But do use these specific knots, it matters.
Okay here goes: the one-time preparation you need to do to your guy lines.
- Place the guy ring on your mast, and measure how high up from the base it rests. You can do this with no wires or lines attached by extending the mast out horizontally on the ground. This measurement is very important, so make sure the guy ring is sitting snug on the mast before you make the measurement. With my mast and setup, the ring is 10 feet 6 inches above the base of the mast.
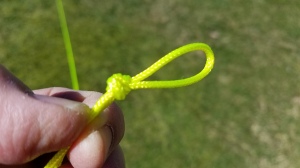
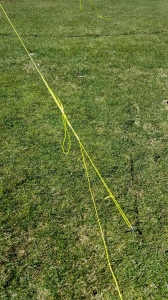
- For each guy line, measure a distance equal to the height of the ring from the point where the line attaches to the ring. At this point, take a bight of the line (a bight just means fold the line and make an open loop) and tie an overhand knot, to create a permanent loop in the guy line at that point. After this step, I had a permanent loop 10 feet 6 inches from the attachment point in each of my guy lines.
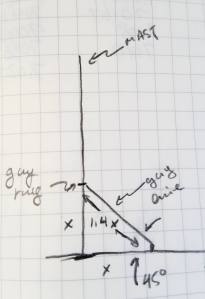
- Here’s where the trigonometry comes in: each guy line when taut forms a triangle, with one point being the guying ring, one point the base of the mast, and one the point of attachment to the ground. We want the angle at the ground attachment point to be 45 degrees, and that means that the ground attachment point will be exactly as far away from the base of the mast as the guy ring is up the mast. (10 feet 6 inches in my case).
And we can also compute the length of the guy line from the ground attachment to the guy ring, it will be 1.4 times the height of the guy ring (trigonometry) or in my case 14.85 feet.Do this calculation for your guy ring height, and round the answer up the next foot, because we want a little slack. I used 15 feet as my value. Measure this distance from the attachment point of the guy line, and tie another permanent loop at this point. Do this for each guy line.
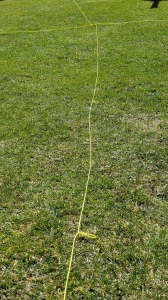
So now you have 4 guy lines, each with two permanent loops tied in them at the same distances.
You are now ready to put up your mast alone. Here’s how to do it:
- Select the spot where the base of the mast will go, and stake the guy ring on the ground through each of the attachment loops. Stretch each line out straight in the direction it needs to go. For four lines, each opposite guy should line up straight.
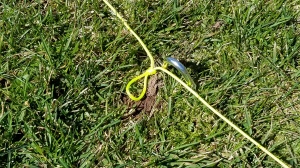
- For each guy in turn, take the stake from the guy ring loop, and push it into the ground where the first permanent loop is. You don’t want to put the stake through the loop, just next to it using the loop as a location marker.
- For each guy, place the second permanent loop around the stake and anchor it. We’re done with the first loop.
- Place the mast on the spot where it will go, and start to extend it through the guy ring. Don’t forget to attach your antenna after you’ve got the mast going through the guy ring. Really.
- Extend the mast a section a time. Ignore the guy lines, pay attention to the antenna wire which is going all sorts of places you don’t want it to.
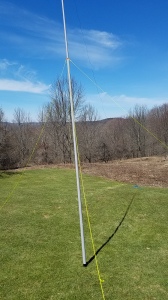
When the mast is fully extended, you can let go. The guys will be loose, but have enough tension to hold the mast upright, although leaning at an angle.
Now it’s time to adjust the guys for proper tension.
To make a tensioning mechanism we’re going to use two knots: a slip loop, and a trucker’s hitch. Go look them up, and then come back here. (Here is a nice YouTube video that demonstrates all the knots I have mentioned.)
Okay, start with guy line opposite the direction the mast is leaning. We will do this on all guys in turn, always moving next to the guy line opposite the lean.
- Tie a slip loop in the guy line about three or four feet up from the stake.
- Grab the line, and slip the permanent loop off the anchor. (Don’t let go of the line.) Loop the standing part of the line around the stake so it can move freely, and pull it up so there is a little tension on the line.
Pull the free end of the guy line through the slip loop, and pull it to tension it the way you want. Tie a trucker’s hitch around both parts of the line to secure it.
Voila, a beautiful, self-standing mast you put up all by yourself. You can tweak the tension on the guy lines until the mast is perfectly vertical. Now what was it I was going to do with this mast… oh, yes..
I know this guying process sounds a little complex, but believe me after you have done it fifty or sixty times it will become second nature. And speaking of nature, what could be better than enjoying the outdoors and ham radio at the same time, hanging around with a bunch of nice guys.
73, de
N2HTT


Nice write up, makes me want to get out and give it a try. Trigonometry, I missed that day at school, I just take my 30 ft fiberglass pole and bungee it to a post or stump or fence post or anything else I can find. It’s fast going up and fast coming down. However you do, just do it! 73 de N6ALT
There’s a lot to be said for the bungee approach, and if the post, rock etc. is available I’m using it. Not knowing what I’ll find its good to be ready for anything.
Michael, A tree is the first choice of course. One time in ten you need the pole, and then there is always at least some shrubbery that you can tie it to. Two low points is sufficient. Bungee or cord is fine. As for antenna, an end fed wire with a 9:1 unun is amazing if you have a tuner. And thanks for calling me today up on Saddleback! Scott kw4jm
Hey Scott, thanks for the advice and for coming back to my weak call yesterday. I’m really looking forward to trying activations, been wanting to do it for years and finally feel like I’m ready to go.
73
Mike